SwiftUI @Environment Complete Guide: System Values, Custom Keys & Best Practices (2025)
Master SwiftUI’s @Environment property wrapper with practical examples, performance tips, and common pitfalls to avoid
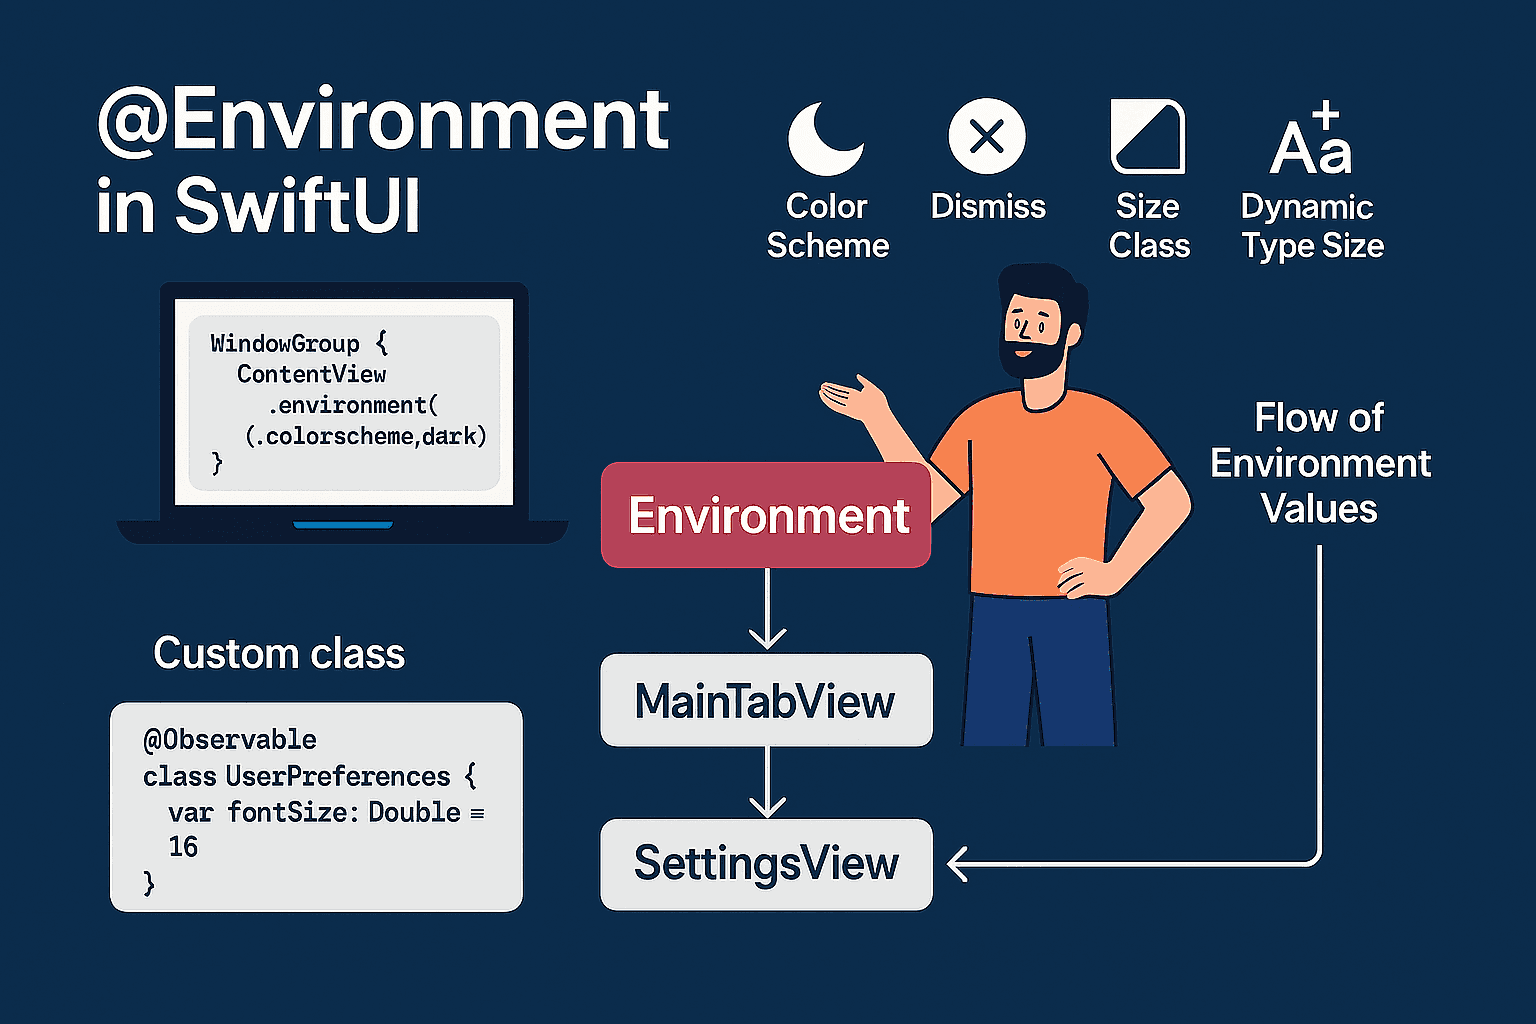

🚀 The Environment Problem Every SwiftUI Developer Faces
Picture this: You’re building an iOS app where users can toggle between light and dark themes. Simple enough, right? But here’s where things get messy…
Your theme preference starts in SettingsView, but you need it in ProfileHeaderView, which is nested inside UserProfileView, which lives in TabContentView, which sits inside your main ContentView.
So what do most developers do? They start passing that theme preference down, view by view:
// The prop drilling nightmare most of us have lived through
struct ContentView: View {
    @State private var userTheme: UserTheme = .system

    var body: some View {
        TabContentView(userTheme: userTheme)
    }
}

struct TabContentView: View {
    let userTheme: UserTheme

    var body: some View {
        UserProfileView(userTheme: userTheme) // Just passing it along...
    }
}

struct UserProfileView: View {
    let userTheme: UserTheme

    var body: some View {
        ProfileHeaderView(userTheme: userTheme) // Still just passing...
    }
}

struct ProfileHeaderView: View {
    let userTheme: UserTheme // Finally! We can actually use it

    var body: some View {
        Text("Profile")
            .foregroundColor(userTheme == .dark ? .white : .black)
    }
}
That’s the power of @Environment - it lets you inject values at the top of your view hierarchy and access them anywhere below without manually threading them through every single view.
📺 Want to see this in action? Check out the complete video tutorial coming soon to Swift Pal: _https://youtube.com/@swift-pal_
**Swift Pal** _👨💻 Welcome to Swift Pal - Your iOS Dev Companion! Whether you're just starting your journey with Swift and SwiftUI…_youtube.comhttps://youtube.com/@swift-pal
But here’s the thing — @Environment isn't just about avoiding prop drilling. It's SwiftUI's way of sharing contextual information that views need to know about their... well, environment. Things like:
- Is the device in dark mode or light mode?
- What’s the current screen size class?
- How should this view dismiss itself?
- What’s the user’s preferred text size?
Apple realized that certain pieces of information are so fundamental to how views should behave that they shouldn’t have to be explicitly passed around. They should just be available when needed.
So in this guide, we’re gonna dive deep into everything @Environment can do. From the built-in system values that Apple gives you for free, to creating your own custom environment values, to understanding when to use @Environment versus @EnvironmentObject (spoiler: this trips up way more developers than it should).
🎯 Understanding @Environment: The Foundation
Alright, so what exactly is @Environment under the hood? Think of it like this - imagine your SwiftUI view hierarchy as a tree, and the environment is like invisible data flowing down through the branches. Any view can tap into this flow without the views above it needing to explicitly pass anything down.
Here’s the basic concept:
// At the root level, you inject data into the environment
WindowGroup {
    ContentView()
        .environment(\.colorScheme, .dark) // System environment value
        .environment(AppSettings())         // iOS 17+ Observable class
}

// Anywhere in your view hierarchy, you can access it
struct DeepNestedView: View {
    @Environment(\.colorScheme) private var colorScheme
    @Environment(AppSettings.self) private var appSettings

    var body: some View {
        Text("Theme: \(colorScheme == .dark ? "Dark" : "Light")")
    }
}
The magic happens because SwiftUI automatically passes this environment data down through every view in the hierarchy. DeepNestedView doesn't need to know where colorScheme or appSettings came from - it just knows it can access them.
How Environment Values Flow
Think of it like Wi-Fi in a building. You set up the router (inject environment values) at one level, and any device (view) on any floor below can connect to it without needing cables running through every room.
@Observable
class UserPreferences {
    var fontSize: Double = 16
    var accentColor: Color = .blue
    var enableNotifications = true
}

struct App: View {
    var body: some View {
        WindowGroup {
            MainTabView()
                .environment(UserPreferences()) // "Wi-Fi router" installed here
        }
    }
}

// Three levels deep - still has access
struct MainTabView: View {
    var body: some View {
        TabView {
            ProfileTab() // Doesn't need to know about UserPreferences
        }
    }
}

struct ProfileTab: View {
    var body: some View {
        NavigationView {
            SettingsView() // Still doesn't need to know
        }
    }
}

struct SettingsView: View {
    @Environment(UserPreferences.self) private var preferences // "Connected to Wi-Fi"

    var body: some View {
        VStack {
            Slider(value: $preferences.fontSize, in: 12...24) {
                Text("Font Size: \(Int(preferences.fontSize))")
            }

            ColorPicker("Accent Color", selection: $preferences.accentColor)

            Toggle("Notifications", isOn: $preferences.enableNotifications)
        }
        .padding()
    }
}
Notice how MainTabView and ProfileTab don't need to know anything about UserPreferences? They're just... transparent to the environment flow. This is what makes @Environment so powerful for app-wide state.
The iOS 17+ Advantage
Before iOS 17, if you wanted to share a complex object like UserPreferences, you had to use the @EnvironmentObject + ObservableObject pattern:
// Pre-iOS 17 way (still works, but more verbose)
class UserPreferences: ObservableObject {
    @Published var fontSize: Double = 16
    @Published var accentColor: Color = .blue
    @Published var enableNotifications = true
}

// Injection
.environmentObject(UserPreferences())

// Access
@EnvironmentObject var preferences: UserPreferences
But with iOS 17’s @Observable macro, you can treat classes just like any other environment value. Less boilerplate, cleaner syntax, and it all goes through the same @Environment property wrapper.
Environment Scope and Overrides
Here’s something that trips people up — environment values can be overridden at any level of the hierarchy:
struct ParentView: View {
    var body: some View {
        VStack {
            ChildView()
                .environment(\.colorScheme, .light) // Override just for this child

            AnotherChildView() // Uses the original environment value
        }
    }
}
This is super useful for things like modal presentations, specific sections of your app, or even just testing different configurations.
The key thing to remember: environment values flow down, and the most recent injection wins for that branch of the view tree.
Next up, we’ll dive into all the system environment values that Apple gives you for free — and trust me, there are way more useful ones than most developers realize.
🔧 System Environment Values: Your Built-in Toolkit
So here’s the thing about SwiftUI — Apple didn’t just give you the @Environment mechanism and leave you to figure everything out yourself. They pre-loaded the environment with a bunch of incredibly useful values that handle common iOS patterns and system states.
Most developers know about colorScheme and maybe dismiss, but there's actually a treasure trove of system values that can save you tons of custom implementation work. Let me walk you through the ones that'll actually make your life easier.

The Essential System Values
Color Scheme & Appearance
struct AppearanceAwareView: View {
    @Environment(\.colorScheme) private var colorScheme

    var body: some View {
        Rectangle()
            .fill(colorScheme == .dark ? Color.gray.opacity(0.3) : Color.gray.opacity(0.1))
            .overlay(
                Text("I adapt to \(colorScheme == .dark ? "dark" : "light") mode")
                    .foregroundColor(colorScheme == .dark ? .white : .black)
            )
    }
}
This one’s everywhere in real apps. Way cleaner than trying to detect system appearance changes manually.
Navigation & Dismissal
struct ModalView: View {
    @Environment(\.dismiss) private var dismiss

    var body: some View {
        VStack {
            Text("Modal Content")

            Button("Close") {
                dismiss()
            }
        }
        .navigationTitle("Modal View")
        .navigationBarTitleDisplayMode(.inline)
    }
}
Clean and direct. Perfect for any presented view that needs to dismiss itself.
Size Classes (The Layout Game Changer)
struct AdaptiveLayout: View {
    @Environment(\.horizontalSizeClass) private var horizontalSizeClass
    @Environment(\.verticalSizeClass) private var verticalSizeClass

    var body: some View {
        Group {
            if horizontalSizeClass == .compact {
                // iPhone portrait, iPhone landscape (some models)
                VStack {
                    ProfileImage()
                    UserDetails()
                }
            } else {
                // iPad, iPhone Plus landscape
                HStack {
                    ProfileImage()
                    UserDetails()
                }
            }
        }
    }
}

struct ProfileImage: View {
    var body: some View {
        Circle()
            .fill(Color.blue)
            .frame(width: 80, height: 80)
    }
}

struct UserDetails: View {
    var body: some View {
        VStack(alignment: .leading) {
            Text("John Doe")
                .font(.headline)
            Text("iOS Developer")
                .font(.subheadline)
                .foregroundColor(.secondary)
        }
    }
}
Size classes are criminally underused. They’re your key to making layouts that actually work well on both iPhone and iPad without a bunch of manual device detection.
App Lifecycle & Scene Management
struct LifecycleAwareView: View {
    @Environment(\.scenePhase) private var scenePhase
    @State private var backgroundTime: Date?

    var body: some View {
        VStack {
            Text("App State: \(scenePhaseDescription)")

            if let backgroundTime = backgroundTime {
                Text("Was backgrounded at: \(backgroundTime, style: .time)")
            }
        }
        .onChange(of: scenePhase) { _, newPhase in
            switch newPhase {
            case .background:
                backgroundTime = Date()
                // Save important data, pause timers, etc.
            case .active:
                // Resume operations, refresh data
                break
            case .inactive:
                // Prepare for potential backgrounding
                break
            @unknown default:
                break
            }
        }
    }

    private var scenePhaseDescription: String {
        switch scenePhase {
        case .active: return "Active"
        case .inactive: return "Inactive"
        case .background: return "Background"
        @unknown default: return "Unknown"
        }
    }
}
This replaces the old UIApplicationDelegate lifecycle methods for most SwiftUI apps. Much cleaner than setting up app delegates just for basic lifecycle tracking.
URL Handling
struct LinkHandlerView: View {
    @Environment(\.openURL) private var openURL

    var body: some View {
        VStack(spacing: 20) {
            Button("Open Safari") {
                openURL(URL(string: "https://developer.apple.com")!)
            }

            Button("Open Settings") {
                openURL(URL(string: UIApplication.openSettingsURLString)!)
            }

            Button("Send Email") {
                openURL(URL(string: "support@yourapp.com")!)
            }
        }
    }
}
Super handy for any app that needs to open external links, settings, or other apps. Way better than dealing with UIApplication.shared.open() directly.
Accessibility & Dynamic Type
struct AccessibilityAwareView: View {
    @Environment(\.dynamicTypeSize) private var dynamicTypeSize
    @Environment(\.accessibilityReduceMotion) private var reduceMotion
    @Environment(\.accessibilityReduceTransparency) private var reduceTransparency

    var body: some View {
        VStack {
            Text("Font scales with system settings")
                .font(.body)

            Rectangle()
                .fill(reduceTransparency ? Color.gray : Color.gray.opacity(0.5))
                .animation(reduceMotion ? nil : .easeInOut, value: reduceTransparency)
        }
        .onChange(of: dynamicTypeSize) { _, newSize in
            // Adjust layouts for larger text sizes if needed
            print("Dynamic type size changed to: \(newSize)")
        }
    }
}
If you’re building accessible apps (and you should be), these environment values are goldmines. They automatically respect user preferences without you having to query accessibility settings manually.
The Complete Reference
Here’s a quick reference of the most useful system environment values:
struct SystemEnvironmentReference: View {
    // Appearance & Layout
    @Environment(\.colorScheme) private var colorScheme
    @Environment(\.horizontalSizeClass) private var horizontalSizeClass
    @Environment(\.verticalSizeClass) private var verticalSizeClass

    // Navigation & Presentation
    @Environment(\.dismiss) private var dismiss
    @Environment(\.isPresented) private var isPresented

    // App Lifecycle
    @Environment(\.scenePhase) private var scenePhase

    // Actions
    @Environment(\.openURL) private var openURL
    @Environment(\.refresh) private var refresh

    // Accessibility
    @Environment(\.dynamicTypeSize) private var dynamicTypeSize
    @Environment(\.accessibilityReduceMotion) private var reduceMotion
    @Environment(\.accessibilityReduceTransparency) private var reduceTransparency

    // System Features
    @Environment(\.editMode) private var editMode
    @Environment(\.isSearching) private var isSearching

    var body: some View {
        Text("Environment values loaded and ready!")
    }
}
The beauty of these system values is that they’re automatically maintained by iOS. You don’t have to set up observers, handle notifications, or manually detect state changes. SwiftUI just… handles it.
Next up, we’ll create our own custom environment values for app-specific data that needs the same kind of global access.
🏗️ Creating Custom Environment Values
Alright, so system environment values are great and all, but what about your app-specific data? That’s where custom environment values come in, and honestly, this is where @Environment really starts to shine.
There are two main approaches in modern SwiftUI: using @Observable classes (the clean iOS 17+ way) or creating custom environment keys (when you need simple values or backwards compatibility).
The Modern Way: @Observable Classes
Let’s start with the approach you should use for new projects. Say you’re building an app with user preferences that need to be accessible throughout your view hierarchy:
import SwiftUI
import Observation

@Observable
class AppSettings {
    var isDarkModeForced: Bool = false
    var preferredFontSize: Double = 16
    var enableNotifications: Bool = true
    var accentColor: Color = .blue
    var userName: String = ""

    // You can even have computed properties
    var effectiveColorScheme: ColorScheme? {
        isDarkModeForced ? .dark : nil
    }
}
Now here’s the beautiful part — injecting and using this is dead simple:
// In your App file
@main
struct MyApp: App {
    var body: some Scene {
        WindowGroup {
            ContentView()
                .environment(AppSettings()) // That's it!
        }
    }
}

// Anywhere in your app
struct SettingsView: View {
    @Environment(AppSettings.self) private var settings

    var body: some View {
        @Bindable var bindableSettings = settings
        Form {
            Section("Appearance") {
                Toggle("Force Dark Mode", isOn: $bindableSettings.isDarkModeForced)

                ColorPicker("Accent Color", selection: $bindableSettings.accentColor)

                HStack {
                    Text("Font Size")
                    Slider(value: $bindableSettings.preferredFontSize, in: 12...24, step: 1)
                    Text("\(Int(settings.preferredFontSize))")
                }
            }

            Section("Profile") {
                TextField("User Name", text: $bindableSettings.userName)
                Toggle("Notifications", isOn: $bindableSettings.enableNotifications)
            }
        }
        .navigationTitle("Settings")
    }
}

// Using the settings elsewhere
struct ProfileView: View {
    @Environment(AppSettings.self) private var settings

    var body: some View {
        VStack {
            Text("Hello, \(settings.userName.isEmpty ? "User" : settings.userName)!")
                .font(.system(size: settings.preferredFontSize))
                .foregroundColor(settings.accentColor)
        }
        .preferredColorScheme(settings.effectiveColorScheme)
    }
}
The magic here is that any changes to settings automatically trigger UI updates in all views that access it. No manual observation setup, no @Published properties - the @Observable macro handles all that for you.
When You Need Custom Environment Keys
Sometimes you don’t need a full observable class. Maybe you just want to pass down a simple value, or you’re supporting iOS versions before 17. That’s when custom environment keys come in handy:
// Step 1: Define the environment key
struct APIEndpointKey: EnvironmentKey {
    static let defaultValue: String = "https://api.production.com"
}

struct DebugModeKey: EnvironmentKey {
    static let defaultValue: Bool = false
}

// Step 2: Extend EnvironmentValues
extension EnvironmentValues {
    var apiEndpoint: String {
        get { self[APIEndpointKey.self] }
        set { self[APIEndpointKey.self] = newValue }
    }

    var isDebugMode: Bool {
        get { self[DebugModeKey.self] }
        set { self[DebugModeKey.self] = newValue }
    }
}

// Step 3: Use them
struct NetworkService: View {
    @Environment(\.apiEndpoint) private var apiEndpoint
    @Environment(\.isDebugMode) private var isDebugMode

    var body: some View {
        VStack {
            Text("API: \(apiEndpoint)")
            Text("Debug: \(isDebugMode ? "ON" : "OFF")")
        }
        .task {
            await fetchData()
        }
    }

    private func fetchData() async {
        // Use apiEndpoint for network calls
        let url = URL(string: "\(apiEndpoint)/users")!

        if isDebugMode {
            print("Fetching from: \(url)")
        }

        // Your networking code here...
    }
}

// Inject at app level or specific branches
struct ContentView: View {
    var body: some View {
        VStack {
            NetworkService()
        }
        .environment(\.apiEndpoint, "https://api.staging.com")
        .environment(\.isDebugMode, true)
    }
}
Backwards Compatibility: The ObservableObject Pattern
If you’re still supporting iOS 16 or earlier, you’ll need to use the ObservableObject approach:
// For iOS 16 and earlier
class LegacyAppSettings: ObservableObject {
    @Published var isDarkModeForced: Bool = false
    @Published var preferredFontSize: Double = 16
    @Published var enableNotifications: Bool = true
    @Published var accentColor: Color = .blue
}

// Inject with .environmentObject()
struct LegacyApp: App {
    @StateObject private var settings = LegacyAppSettings()

    var body: some Scene {
        WindowGroup {
            ContentView()
                .environmentObject(settings)
        }
    }
}

// Access with @EnvironmentObject
struct LegacySettingsView: View {
    @EnvironmentObject var settings: LegacyAppSettings

    var body: some View {
        Toggle("Force Dark Mode", isOn: $settings.isDarkModeForced)
    }
}
Real-World Example: Theme Management
Here’s a complete example of a theme management system using modern @Observable:
@Observable
class ThemeManager {
    var currentTheme: AppTheme = .system
    var customAccentColor: Color = .blue
    var useCustomAccent: Bool = false

    var effectiveAccentColor: Color {
        useCustomAccent ? customAccentColor : currentTheme.defaultAccentColor
    }

    var effectiveColorScheme: ColorScheme? {
        switch currentTheme {
        case .light: return .light
        case .dark: return .dark
        case .system: return nil
        }
    }
}

enum AppTheme: String, CaseIterable {
    case light = "light"
    case dark = "dark"
    case system = "system"

    var displayName: String {
        switch self {
        case .light: return "Light"
        case .dark: return "Dark"
        case .system: return "System"
        }
    }

    var defaultAccentColor: Color {
        switch self {
        case .light: return .blue
        case .dark: return .cyan
        case .system: return .accentColor
        }
    }
}

// Usage throughout the app
struct ThemedView: View {
    @Environment(ThemeManager.self) private var themeManager

    var body: some View {
        VStack {
            Text("Themed Content")
                .foregroundColor(themeManager.effectiveAccentColor)

            Button("Action") {
                // Button action
            }
            .tint(themeManager.effectiveAccentColor)
        }
        .preferredColorScheme(themeManager.effectiveColorScheme)
    }
}
The beauty of this approach is that your theme changes propagate instantly throughout your entire app without any manual coordination between views.
⚡ Environment Patterns Comparison: When to Use What
Alright, let’s tackle the big question that confuses pretty much every SwiftUI developer at some point: “When do I use @Environment, when do I use @EnvironmentObject, and what's this new @Observable thing all about?"
Decision Flowchart
Here’s how I decide which pattern to use:
Is it a complex object with multiple properties that can change?
├─ YES: Do you support iOS 17+?
│  ├─ YES: Use @Environment with @Observable
│  └─ NO: Use @EnvironmentObject with ObservableObject
└─ NO: Is it a simple value or configuration?
   └─ YES: Use @Environment with custom key
Performance Considerations
There are some subtle performance differences between these patterns:
// @Observable is more efficient - only updates views that access changed properties
@Observable
class EfficientCounter {
    var count = 0
    var name = "Counter"
}

struct CounterView: View {
    @Environment(EfficientCounter.self) private var counter

    var body: some View {
        // Only updates when 'count' changes, not 'name'
        Text("Count: \(counter.count)")
    }
}

// ObservableObject updates ALL views when ANY @Published property changes
class LessEfficientCounter: ObservableObject {
    @Published var count = 0
    @Published var name = "Counter"
}

struct LegacyCounterView: View {
    @EnvironmentObject var counter: LessEfficientCounter

    var body: some View {
        // Updates when EITHER 'count' OR 'name' changes
        Text("Count: \(counter.count)")
    }
}
The @Observable macro is smarter about tracking which properties views actually use, so it can optimize updates better. But… It can also turn into your benefit, when your requirement might be to only Publish some properties and not all.
Common Mistakes and Fixes
Mistake 1: Mixing Patterns
// ❌ Don't do this - mixing injection styles
WindowGroup {
    ContentView()
        .environment(AppSettings()) // @Observable
        .environmentObject(UserManager()) // ObservableObject
}

// ✅ Pick one approach and stick with it
WindowGroup {
    ContentView()
        .environment(AppSettings())
        .environment(UserManager()) // Both using @Observable
}
Mistake 2: Forgetting @Bindable
// ❌ This won't compile
struct SettingsView: View {
    @Environment(AppSettings.self) private var settings

    var body: some View {
        Toggle("Dark Mode", isOn: $settings.isDarkMode) // Error!
    }
}

// ✅ Use @Bindable for two-way binding
struct SettingsView: View {
    @Environment(AppSettings.self) private var settings

    var body: some View {
        @Bindable var bindableSettings = settings

        Toggle("Dark Mode", isOn: $bindableSettings.isDarkMode)
    }
}
Migration Strategy
If you’re updating an existing app from @EnvironmentObject to @Observable:
- Start with new features using
@Observable - Gradually migrate existing
ObservableObjectclasses - Update injection sites from
.environmentObject()to.environment() - Update consumption sites from
@EnvironmentObjectto@Environment(Type.self) - Add
@Bindablewhere you need two-way binding
The migration can be done incrementally — both patterns can coexist in the same app.
🎨 Bonus: Advanced Patterns & Best Practices
Now that you’ve got the basics down, let’s dive into some patterns that’ll make your SwiftUI code more maintainable and your environment usage more sophisticated. These are the techniques I wish I knew when I started working with @Environment in production apps.
Environment Scoping & Overrides
One of the most powerful features of environment values is that you can override them at any level of your view hierarchy:
@Observable
class DevelopmentSettings {
    var showDebugInfo: Bool = false
    var apiEndpoint: String = "https://api.production.com"
    var mockData: Bool = false
}

struct ProductionApp: View {
    var body: some View {
        NavigationView {
            MainContentView()
        }
        .environment(DevelopmentSettings()) // Production defaults
    }
}

struct DebugContentView: View {
    var body: some View {
        VStack {
            MainContentView()
                .environment(createDebugSettings()) // Override for this branch

            Text("Debug Mode Active")
                .foregroundColor(.red)
        }
    }

    private func createDebugSettings() -> DevelopmentSettings {
        let debugSettings = DevelopmentSettings()
        debugSettings.showDebugInfo = true
        debugSettings.apiEndpoint = "https://api.staging.com"
        debugSettings.mockData = true
        return debugSettings
    }
}
This is super useful for:
- Debug vs release configurations
- A/B testing different features
- Modal presentations that need different behavior
- Preview environments
Performance Optimization Tips
Tip 1: Minimize Environment Object Scope
Don’t inject environment values higher than necessary:
// ❌ Too broad - entire app gets UserSettings even if only settings screen needs it
WindowGroup {
    ContentView()
        .environment(UserSettings())
}

// ✅ More targeted - only settings flow gets UserSettings
struct SettingsFlow: View {
    var body: some View {
        NavigationView {
            SettingsListView()
        }
        .environment(UserSettings()) // Scoped to just settings
    }
}
Tip 2: Use Computed Properties for Derived Values
Instead of storing derived values in your observable objects, compute them:
@Observable
class AppSettings {
    var primaryColor: Color = .blue
    var secondaryColor: Color = .green

    // ✅ Computed - only recalculates when needed
    var gradientColors: [Color] {
        [primaryColor, secondaryColor]
    }

    // ❌ Stored - takes up memory and needs manual updates
    // var gradientColors: [Color] = [.blue, .green]
}
Tip 3: Environment Value Caching
For expensive computations based on environment values:
struct ExpensiveView: View {
    @Environment(AppSettings.self) private var settings
    @State private var cachedResult: String = ""
    @State private var lastSettings: AppSettings?

    var body: some View {
        Text(cachedResult)
            .onChange(of: settings.primaryColor) { _, _ in
                updateCachedResult()
            }
            .onAppear {
                updateCachedResult()
            }
    }

    private func updateCachedResult() {
        // Only recalculate if settings actually changed
        guard lastSettings !== settings else { return }

        // Expensive computation here
        cachedResult = performExpensiveCalculation(with: settings)
        lastSettings = settings
    }

    private func performExpensiveCalculation(with settings: AppSettings) -> String {
        // Simulate expensive work
        return "Processed: \(settings.primaryColor.description)"
    }
}
Managing Environment Scope
Understanding when and where to inject environment values is crucial for both performance and maintainability:
struct AppRoot: View {
    var body: some View {
        WindowGroup {
            TabView {
                // Each tab gets its own scoped environment
                HomeTab()
                    .tabItem { Label("Home", systemImage: "house") }

                SettingsTab()
                    .tabItem { Label("Settings", systemImage: "gear") }
                    .environment(UserPreferences()) // Only settings needs this

                ProfileTab()
                    .tabItem { Label("Profile", systemImage: "person") }
                    .environment(UserSession()) // Only profile needs this
            }
            .environment(AppTheme()) // Global theme for all tabs
        }
    }
}
Overriding Environment Values in Child Views
Sometimes you need to temporarily override environment values for specific UI states:
struct DocumentEditor: View {
    @Environment(AppTheme.self) private var theme
    @State private var isInFocusMode = false

    var body: some View {
        VStack {
            if isInFocusMode {
                // Override theme for focus mode
                EditorContent()
                    .environment(focusModeTheme)
            } else {
                EditorContent()
                // Uses normal theme from parent
            }

            Toggle("Focus Mode", isOn: $isInFocusMode)
        }
    }

    private var focusModeTheme: AppTheme {
        let focusTheme = AppTheme()
        focusTheme.primaryColor = .gray
        focusTheme.backgroundColor = .black
        focusTheme.textColor = .white
        return focusTheme
    }
}
This pattern is great for modal states, special viewing modes, or temporary UI configurations that shouldn’t affect the rest of your app.
🎬 Wrapping Up: Mastering @Environment
We’ve covered a lot of ground here — from basic system environment values to building complete authentication and theming systems. The key takeaway? @Environment isn't just about avoiding prop drilling (though it does that beautifully). It's about creating clean, maintainable architecture for your SwiftUI apps.
Remember the essentials:
- Use
@Environment(YourClass.self)with@Observablefor iOS 17+ - Fall back to
@EnvironmentObjectfor older iOS versions - Custom environment keys work great for simple values
- Always use
@Bindablewhen you need two-way binding - Scope your environment values appropriately
The patterns we’ve explored will scale from simple apps to complex, production-ready applications. Start with the basics, then gradually incorporate the advanced patterns as your app grows.
🎉 Enjoyed this article? Your support means the world to me!
💬 Drop a comment below! I love hearing about your experiences and answering questions
🎬 Subscribe on Youtube and become early subscribers of my channel: https://www.youtube.com/@swift-pal
💼 Let’s connect on LinkedIn for more professional insights: https://www.linkedin.com/in/karan-pal
Happy coding! 🚀
New articles, straight to your inbox.
No spam, no filler — just new writing on iOS, the web, and AI when it ships. Unsubscribe anytime.
Keep reading
Your CPU Has More Cores Than Your Job Can Use
Some work splits cleanly across hundreds of cores. Other work is a chain of steps where every new step has to wait for the last one to finish.
ReadYour Password Isn’t as Random as You Think
Crack-time calculators measure the size of a theoretical password space—not how people actually choose passwords or how attackers search them.
Read